SOLIDWORKS PARA INICIANTES - EXERCÍCIO 41
SolidWorks Practice Session
Introduction to the Lesson
- Felipe welcomes viewers to another SolidWorks lesson, emphasizing the importance of practicing regularly to retain knowledge.
- He advises that consistent practice is crucial; taking breaks can lead to difficulties in using the software later on.
Importance of Regular Practice
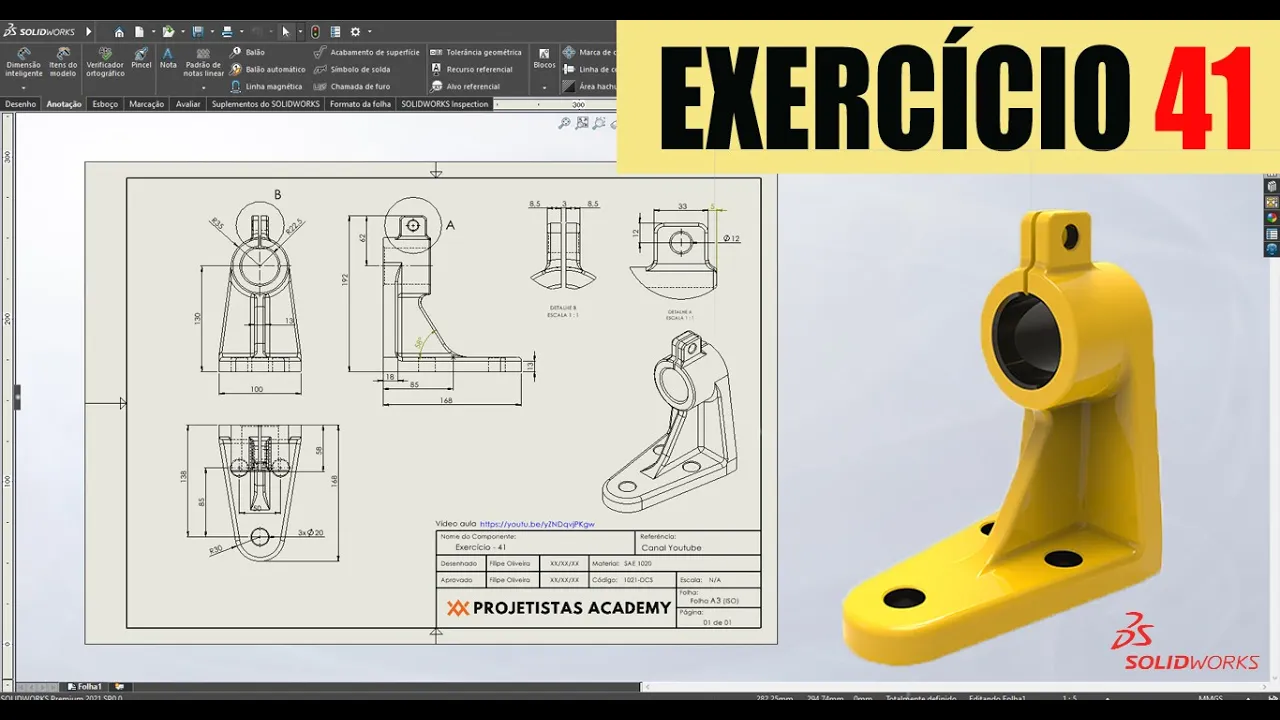
- The session focuses on Exercise 41 out of a total of 41 exercises available for free on his channel.
- Felipe encourages viewers who haven't completed all exercises to do so, highlighting additional content available on metal sheets and surfaces.
Resources for Learning
- A PDF resource is provided for technical drawing practice, allowing students to have materials at home for further study.
- Felipe promotes his SolidWorks course at Projetistas Academy for those looking to deepen their understanding and skills in the software.
Starting the Modeling Process
- The modeling session begins with Felipe demonstrating how to create a new drawing from scratch, focusing on simplicity and efficiency.
- He explains the layout of views including front, top, side, and detailed views which will be used in this exercise.
Step-by-Step Drawing Instructions
- Using the top plane as a base, he initiates sketching by selecting a midpoint line starting from the origin.
- After creating a triangle shape, he aligns points vertically using constraints for precision in design.
Dimensioning Techniques
- Felipe discusses setting dimensions such as width (100mm), radius (30mm), and other critical measurements necessary for accurate modeling.
- He emphasizes calculating distances correctly by considering existing shapes within the sketch before finalizing dimensions.
Finalizing Sketch Elements
- The process includes adding circles with specific diameters (20mm), ensuring they are equally spaced based on given distances (50mm apart).
- Alignment techniques are demonstrated through symmetry commands that help maintain balance in design elements.
Creating Features from Sketches
- After completing sketches, Felipe moves towards creating features like extrusions or cuts based on defined parameters.
- He highlights important aspects such as maintaining proper alignment and dimensioning throughout the modeling process.
Creating a 3D Model in SolidWorks
Initial Setup and Sketching
- The process begins with placing a 15mm dimension on the base of the piece, confirming the command to finalize the initial setup.
- A sketch is created by selecting the back face and using "Convert Entities" to copy lines from that face, allowing for accurate replication of geometry.
- Two concentric circles are drawn with outer diameter 35mm and inner diameter 22.5mm; dimensions are set using intelligent dimensioning tools.
Centering and Adjustments
- The center of the circles is aligned vertically with respect to the origin, ensuring proper placement within the model.
- A line is drawn from one circle's center to another, creating symmetry; entities are mirrored for efficiency in design.
Adding Features
- A feature called "Rib" is introduced with a thickness of 15mm; areas are selected carefully to ensure correct contour selection.
- An additional rib feature is created extending outward, with dimensions set at 30mm and an overall length of 55mm.
Creating Additional Elements
- A new rib feature is added on a right plane, utilizing specific angles (58°) and distances (85mm), showcasing precise control over geometry.
- The rib tool confirms settings for thickness (10mm), demonstrating ease in adding structural elements.
Finalizing Design Details
- An ear-like structure at the top requires careful selection of planes; rectangle dimensions are set at 3mm thick to accommodate future features without overlap.
- Intelligent dimensioning ensures that all parts fit correctly within specified limits, emphasizing precision in modeling practices.
Addressing Challenges
- Height constraints for features are established based on existing geometry; adjustments made when necessary highlight problem-solving skills during design.
- Creative solutions arise when standard references aren't available; users learn to create their own reference points for accurate measurements.
Designing with Creativity and Precision
Importance of Decision-Making in Design
- The instructor emphasizes that not all design elements will be provided directly, encouraging students to develop their creativity and decision-making skills.
- Students are urged to practice and make mistakes during training rather than in a professional setting, highlighting the value of learning through experience.
Learning from Mistakes
- The instructor observes that some students attempt to work from PDFs without attending classes, leading to confusion. He stresses the importance of engaging with lessons for better understanding.
- A specific example is given where the instructor demonstrates how small changes (like radius adjustments) can significantly impact the overall design.
Technical Skills Development
- The process of creating holes in designs is discussed, including dimensions and centralization techniques.
- Techniques for finding center points in circles are explained, showcasing practical methods for achieving precision in designs.
Calculating Dimensions Effectively
- The instructor discusses calculating total thickness using simple arithmetic instead of relying on calculators, promoting self-sufficiency in technical tasks.
- SolidWorks is mentioned as a helpful tool for confirming commands and calculations efficiently.
Finalizing Design Elements
- The discussion shifts to finishing touches like adding fillets (radii), which are typically done at the end of the design process for ease.
- The importance of making these adjustments before final cuts is highlighted to ensure smooth transitions between different parts of the piece.
Practical Application and Adjustments
- A step-by-step guide on creating features such as grooves is provided, emphasizing intelligent dimensioning throughout the process.
- Troubleshooting tips are shared regarding defining heights and ensuring all elements are properly constrained within designs.
Refining Details
- Techniques for visualizing hidden lines during design work are discussed, aiding clarity when working with complex shapes.
- The necessity of creating multiple cutting directions based on plan orientation is explained as part of effective modeling practices.
Enhancing Aesthetic Features
- Finally, attention turns to aesthetic details like radii on edges. Different sizes are tested to achieve a natural look while maintaining structural integrity.
How to Enhance Your Design with Fillets and Chamfers
Understanding the Process of Adding Fillets
- The speaker demonstrates selecting a line in a design software, emphasizing the importance of making precise adjustments for better aesthetics.
- He explains that choosing the right fillet size requires practice and experimentation, encouraging viewers to train their eyes to recognize appropriate measurements.
- Viewers are invited to share their own designs after applying learned techniques, fostering community engagement through email or Instagram.
Techniques for Improving Aesthetics
- The speaker discusses removing edges to create a more visually appealing piece by adding fillets, highlighting how this can enhance overall design quality.
- He points out an error in chamfering within the design process and corrects it by focusing on specific edges rather than faces.
Finalizing the Design
- After completing adjustments, he shows how to visualize the entire design effectively using different viewing options available in the software.
- The speaker applies color to the component, specifically choosing a green shade that is visually pleasing and commonly used in designs.
Community Engagement and Learning Opportunities
- He encourages viewers who enjoyed the content to like and share it, explaining how this helps distribute educational material more widely.
- An invitation is extended for viewers to join study groups on WhatsApp and Telegram, promoting collaboration among learners at various skill levels.
Conclusion and Encouragement