Mate simple con el Rey y la Torre
How to Checkmate with a Rook and King
Understanding the Basics of Rook and King Checkmate
- The checkmate requires collaboration between the rook and king, working as a united team. The checkmate can only occur at the edge of the board.
- White, having the advantage of a rook, must corner the black king until it reaches an edge. For example, moving the rook to h8 results in checkmate.
Different Edges for Checkmating
- Checkmates can occur on any edge of the board; for instance, using rook h8 or rook a1 also leads to checkmate by controlling escape squares.
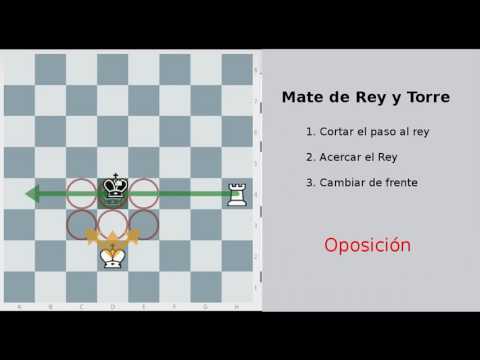
- The classic method involves pushing the enemy king towards an edge where it can be checkmated. The first step is to move the rook to cut off escape routes for the black king.
Executing Classic Checkmating Techniques
- After cutting off escape routes with the rook, white should position their own king in front of the black king to prepare for checkmate when they are facing each other (known as opposition).
- If black approaches to capture the rook, white should switch its position (a maneuver called "changing fronts") while keeping distance from the enemy king. This prevents immediate threats against their rook.
Maintaining Control Over Escape Routes
- When kings face each other in opposition, white can deliver checks that force back movements from black's king while maintaining control over key squares around it. This gradually restricts space for black's movement.
- As white advances their own king closer while forcing back movements from black’s side (e.g., moving f5), they continue applying pressure until reaching one side of the board where checkmate becomes inevitable.
Strategic Moves and Timing
- It’s crucial not to rush into changing positions too close to black’s king; instead, losing time strategically with moves like repositioning allows better control over future actions without risking capture of pieces.
- If positioned correctly and timing is managed well (e.g., allowing black's moves that don’t threaten), white can maintain dominance until achieving final positioning for checkmate near an edge of the board.
By following these strategies and understanding how to effectively use both pieces together, players can successfully execute a checkmate with a rook and their own king against an opposing lone king.
Chess Strategy: Central Columns and King Movement
Importance of Central Columns
- The discussion begins with the significance of maintaining control over central columns in chess. If the black pieces move towards one side, it creates a situation similar to previous positions.
- The strategy involves forcing the black king to approach the rook, which allows for tactical advantages by changing fronts with the rook.
Tactical Maneuvers
- Maintaining distance from the opponent's king is crucial. If positioned correctly, it can lead to immediate checkmate scenarios.
- The importance of keeping a knight's distance is emphasized; if the opposing king approaches, it can result in checkmate quickly.
Key Positioning Strategies