Map and Compass (Simplified)
Introduction to Basic Land Navigation
In this section, the speaker introduces the topic of basic land navigation using a map and compass.
Suunto MC2 Compass Features
- The Suunto MC2 compass has a signal and sighting mirror at the top, which can be used for hygiene purposes as well.
- It has a rotating bezel ring with numbers representing degrees for azimuth or bearing.
- Inside the bezel ring, there is a sensitive magnetic needle that points north (red) and south (black).
- Perpendicular to the magnetic needle, there is an orienting arrow or doghouse.
- Below the orienting arrow, there are glow-in-the-dark lines indicating current direction and previous direction.
- The compass also features a clear plastic base plate with various scales and a magnifying lens for starting fires.
Comparison between Suunto MC2 and Lensatic Compass
This section discusses why the speaker prefers using the Suunto MC2 compass over a lensatic compass.
Advantages of Suunto MC2 Compass
- The Suunto MC2 compass is preferred due to its multi-use features, including a signal mirror, sighting mirror, and magnifying lens for starting fires.
- The options contained in the Suunto MC2 make navigation easier in outdoor environments compared to a lensatic compass.
Shooting an Azimuth with a Compass
This section provides instructions on how to shoot an azimuth using a compass.
Steps to Shoot an Azimuth
- Look at your compass with an arrow or glooms arc indicator on top indicating current direction and another one at the bottom indicating previous direction.
- Set your bezel ring to zero or north by aligning it with the glow-in-the-dark indicator on top.
- Look out in the direction you want to go and hold your compass with extended arms, ensuring it is level.
- Use the sighting mirror or signal mirror to look through the v-notch at the bottom of the compass.
- Align your target (e.g., a tree) with the gun sight formed by the v-notch.
- Rotate the bezel ring until the orienting arrow or doghouse aligns with the magnetic needle, putting red in the shed or dog in the doghouse.
- Check and note down your azimuth reading from the bezel ring once aligned.
- Follow that azimuth to reach your desired destination.
Using Azimuth for Navigation
This section explains how to use an azimuth for navigation.
Navigating with Azimuth
- Once you have determined your azimuth, walk along that bearing until you reach a specific point (e.g., a tree).
- Upon reaching that point, step to its opposite side and reshoot your azimuth to maintain direction.
- Continue walking in a straight line based on your azimuth to stay on course.
Conclusion
The speaker concludes by summarizing that they started at a specific point using a 40-degree bearing or azimuth.
Summary
- The starting point was established using a 40-degree bearing or azimuth, which was followed as a straight line of navigation.
Timestamps are approximate and may vary slightly depending on video playback.
Navigating with a Compass
The speaker discusses using a compass to navigate and locate new targets.
Using a Compass
- To navigate, the speaker suggests moving to the opposite side of a tree and then using a compass to locate a new target.
- Once the target is located, continue walking in a straight line at 40 degrees.
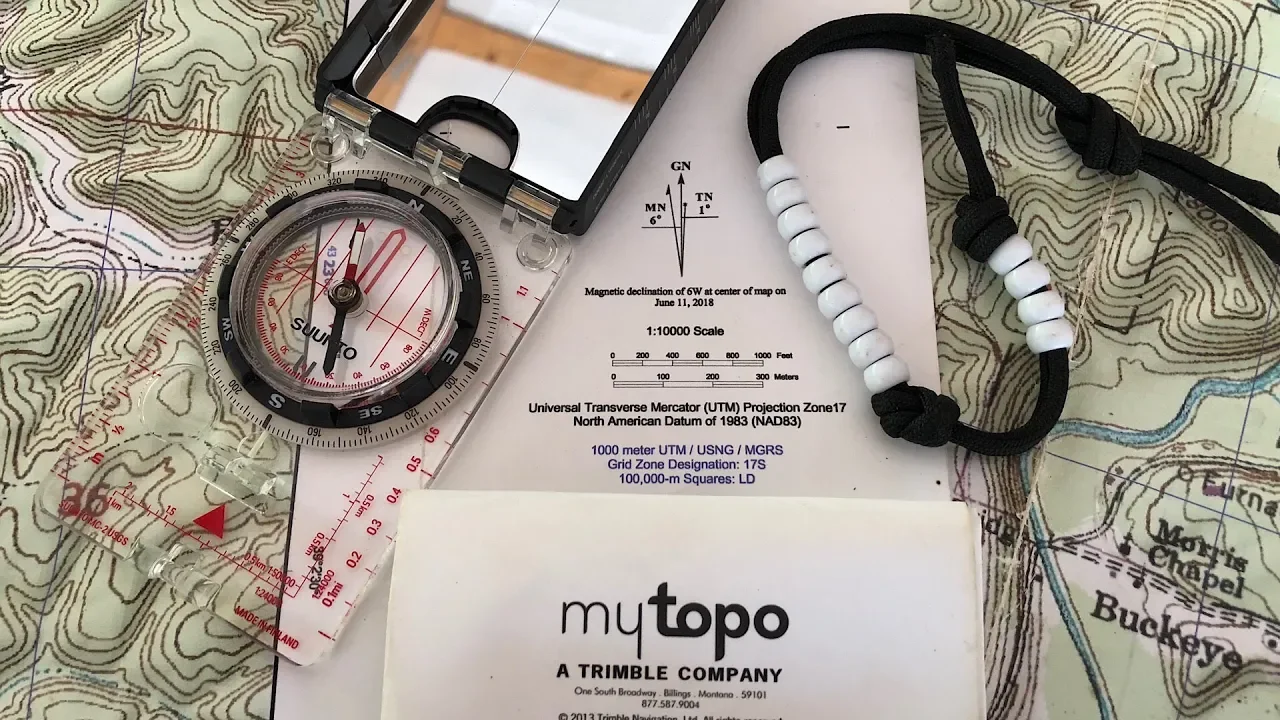
Understanding Topographical Maps
The speaker explains the different components of topographical maps.
Components of Topographical Maps
- Opening the topographical map, the first thing seen is the map legend and information about the map.
- The vicinity map shows an outline of the state being operated in, with a red square or rectangle indicating the area.
- Dates on the map indicate when it was printed and surveyed.
- The declination diagram provides readings for true north, grid north, and magnetic north.
- Map scale indicates how distances on the map correspond to actual distances on the ground.
Map Colors and Symbols
The speaker explains different colors and symbols used on topographical maps.
Map Colors
- Black represents man-made structures.
- Blue represents water bodies such as rivers, streams, lakes, etc.
- Green represents vegetation or forested areas.
- Brown may represent relief features like contour lines (explained later).
- Red indicates boundaries or highways while other colors convey special information found in the legend.
Understanding Contour Lines
The speaker discusses the importance of contour lines in determining elevation on topographical maps.
Contour Lines
- Contour lines help judge elevation and are indicated by intervals specified in the map legend.
- Every fifth contour line is darker and marked with a specific elevation.
- Closer contour lines indicate rapid changes in elevation.
Major and Minor Terrain Features
The speaker introduces major and minor terrain features found on topographical maps.
Major Terrain Features
- Hilltops are identified by rings or circles within circles.
The transcript provided does not cover additional sections beyond this point.
Ridge, Saddle, Valley, Depression, Draw, Spur, Cliff
This section discusses various terrain features such as ridge, saddle, valley, depression, draw, spur, and cliff.
Ridge
- A ridge is a series of hilltops in a row.
- It is formed by multiple hilltops in a line.
Saddle
- A saddle refers to two or more hilltops in a row with lower ground between them.
- It is the area between two hilltops on a ridge.
Valley
- A valley is a rounded area bordered by higher ground on two or three sides.
- It forms a U-shaped structure.
Depression
- A depression is an area surrounded by higher ground on all sides.
- It has sloping tick marks indicating lower ground.
Draw
- A draw is sloping terrain that forms a V shape pointing towards a ridge.
- It indicates the direction towards the ridge from the draw's point.
Spur
- A spur is contour lines that jut outward from a ridge and make their way down into a valley.
- It extends outward from the main ridge line.
Cliff
- A cliff consists of vertical or sloping contour lines close together indicating steep drop-off.
- Tick marks are used to show the steepness of the drop-off.( 00;13;20)
Reading Maps and Determining Grid Squares
This section explains how to read a map and determine the grid square you are operating in.
Reading Maps
- Maps have longitude and latitude lines.
- Longitude lines run up and down, while latitude lines go horizontally or sideways.
- To read a map, start at the bottom left corner and move right, then go up.
- Use numbers and letters to locate specific grid squares on the map.
Determining Grid Square
- Each grid square is 1000 meters by 1000 meters.
- Start at the bottom left corner of the map and move right until you reach the desired number. Then go up to find the corresponding letter.
- For example, if you want to be in grid square 6922, start at the bottom left corner, slide over to 69, then go up to 22.
Map and Compass Integration
This section discusses how maps and compasses work together.
Map and Compass Integration
- True north refers to north according to Earth's axis. Magnetic north is determined by the magnetic needle's direction. Grid north refers to northern lines on a map.
- Rotate your map so that it aligns with true north before using it for navigation purposes.
Understanding Magnetic Declination
In this section, the speaker explains the concept of magnetic declination and its significance in navigation.
Magnetic North vs. Grid North
- Magnetic declination refers to the difference between magnetic north and grid north.
- A sixth degree offset exists between magnetic north and grid north.
- This means that when shooting an azimuth, there can be a six-degree difference in direction.
- Each degree of deviation equals 92 feet in one mile or one mile off in 60 miles.
Accounting for Magnetic Declination
- To account for the six-degree difference, it is important to make maps and compasses work together.
- The speaker uses a military analogy: "Major to general is a promotion" - adding degrees from magnetic north to grid north.
- Conversely, "General to major is a demotion" - subtracting degrees from grid north to magnetic north.
Adjusting Compass for Declination
- The Suunto MC2 compass has a declination indicator on its bezel ring.
- By flipping over the compass, it indicates whether the declination is east or west.
- To adjust for declination, use a key or small screwdriver to rotate the adjustment pin on the backside of the compass.
- Each red tick mark on the bezel represents two degrees of adjustment.
Map Orientation and Route Planning
This section focuses on orientating maps and planning routes effectively.
Orientating Maps
- To orientate a map, place your compass at the bottom left corner aligned with the map's border.
- Ensure no contact with metal surfaces or picnic tables that may interfere with accuracy.
- Once properly aligned, you are dialed into grid north.
Route Planning
- Route planning involves determining bearings or azimuths for each location.
- Reverse azimuths or bearings are used to navigate back to starting points.
- Pace count and knowledge of the operating grid location are essential for route planning.
Measuring Distances on Maps
- The speaker demonstrates measuring a distance of 300 meters on the map, which corresponds to approximately an inch and 3/16.
The transcript ends abruptly after this point.
Route Planning and Exploration
In this section, the speaker discusses their plan to explore an area starting from a parking lot. They mention walking to a hilltop, crossing a saddle, and finding a water source. They also explain how to use a compass to navigate back to the starting point.
Walking to the Hilltop and Finding Water
- The speaker wants to walk from the parking lot to a hilltop nearby for exploration.
- After reaching the hilltop, they can look down a spur and locate a water source.
- It is important to stay hydrated before continuing the journey.
Using a Compass for Navigation
- To navigate back to the starting point, the speaker suggests using a compass.
- Place the compass on the start point and align it with the center of the desired hilltop.
- Draw a line from the hilltop to the start point on the map.
- Rotate the bezel ring of the compass until zero aligns with "red in shed" or "dog in doghouse."
- Read off the azimuth or bearing indicated by the top glow-in-the-dark indicator (30 degrees in this example).
Measuring Distance
- Estimate distance by measuring on paper or using an inch scale on your compass.
- The speaker estimates that 1 3/16 inches corresponds roughly to 300 meters.
- In this case, rounding up to 1 1/4 inches gives an estimated distance of about 620 meters.
Return Journey
- For returning, determine azimuth using bottom glow-in-the-dark indicator (210 degrees in this example).
- Use landmarks like fences, walls, rivers, or pipelines as backstops not to be crossed.
Navigational Tools for Route Planning
The speaker introduces five navigational tools that can make route planning easier: handrail, backstop, baseline, aiming off, and escape or panic azimuth.
Handrail
- A handrail is a linear object used as a guideline for navigation.
- In the example given, a road parallel to the desired direction of travel can serve as a handrail.
Backstop
- A backstop is a point beyond which you should not go.
- Examples include fences, walls, large rivers, bodies of water, and pipelines.
- The speaker mentions using a creek as a backstop in one scenario.
Baseline
- A baseline is an easily identifiable feature used for navigation.
- It can be a prominent landmark or natural formation that helps maintain direction.
Aiming Off
- Aiming off involves intentionally navigating slightly to one side of your target.
- This strategy ensures that even if you miss your target slightly, you will still end up in the vicinity.
Escape or Panic Azimuth
- An escape or panic azimuth is a predetermined direction to follow in case of emergency or disorientation.
- It provides a quick way to get back on track and find familiar landmarks.
The transcript was provided in English.
New Section
This section discusses the concept of using baselines and aiming off in land navigation.
Baseline and Aiming Off
- A baseline is used as a reference point to return to the starting position.
- A baseline is often used in conjunction with aiming off, which involves deliberately deviating from the desired path to ensure an easier return.
- By taking a bearing left or right of the objective and using a baseline, one can easily navigate back to the starting point.
Using Baselines for Navigation
- Baselines are useful when there is an easier route or less brush that can be utilized.
- Shooting an azimuth or bearing through this easier route helps in reaching the objective faster.
- If lateral drift occurs or if one ends up off track, using a baseline allows for easy correction by turning left or right.
Example Scenario
- The example scenario involves identifying landmarks such as a hilltop, creek, stream, and road.
- Shooting an azimuth directly to a specific intersection helps gather information for map navigation.
- In case of getting lost or drifting away from the intersection, deliberately aiming off and using the road as a baseline enables easy navigation back to the desired location.
New Section
This section explains escape or panic azimuths that can be used when lost during land navigation.
Escape Azimuth
- An escape azimuth is a predetermined bearing that can be dialed into a compass when one is lost and needs to reach a known point like a road or a house.
- It serves as a reliable direction to escape from the current location.
Escape Routes
- By dialing in the predetermined azimuth, one can navigate towards a road or pipeline for assistance.
- Different bearings such as zero, 270, and 180 can be used depending on the desired destination.
- Practice and familiarity with escape azimuths enhance navigation skills and preparedness in case of emergencies.
New Section
This section concludes the discussion on land navigation techniques and emphasizes the importance of practice.
Final Thoughts
- Land navigation requires practical application of tools and techniques learned.
- Watching previous videos on land navigation simplification is recommended before attempting to apply these concepts.
- Practice is essential for improving navigation skills, although perfection may not be attainable.
- Continuous improvement is possible through consistent practice and learning from experiences in the field.