Retoque Fotográfico En Photoshop | Retoque De Fotografía Profesional 🖥✍
How to Retouch Photos Using Frequency Separation Technique
Introduction to Frequency Separation
- Alexander Giraldo introduces the video, focusing on retouching photographs using frequency separation. He mentions a previous comprehensive video on the topic and promises an additional Photoshop action for easier processing.
Overview of Actions in Photoshop
- The presenter outlines the actions available for photo editing, including frequency separation, eye color adjustment, and exposure enhancement. These actions are grouped together for convenience.
- Instructions are provided on how to install the Photoshop actions by opening them through the file menu.
Steps for Frequency Separation
- To begin frequency separation, duplicate the image layer twice using Control + J. The first layer will have Gaussian blur applied with a radius of 33 pixels.
- The second layer involves applying an image adjustment where you select Layer 1 and set its blending mode to 'Add' with a scale factor of 2.
Working with Layers
- After setting up layers, apply linear light blending mode to achieve frequency separation. This allows further editing without losing detail.
- Use the healing brush tool in 'Lighten' mode at 40% opacity to smooth out skin imperfections effectively.
Automating the Process
- The action created automates much of this process; users can simply click play after selecting it to apply frequency separation automatically.
- It’s crucial that layers remain locked during application; otherwise, errors may occur when trying to reapply adjustments.
Final Touches on Skin Retouching
- Once initial adjustments are made, focus shifts towards refining skin texture by removing blemishes using patch tools while ensuring proper selection techniques.
- After addressing imperfections like scars or wrinkles, toggle visibility between layers to ensure all edits appear seamless and natural.
Conclusion of Editing Process
Techniques for Skin Retouching in Photoshop
Cloning and Color Correction
- The process begins with selecting a clean area of skin to clone, which helps in correcting darker spots by matching lighter areas.
- To reduce dark circles, select a slightly lighter area and paint over the targeted region for a more even appearance.
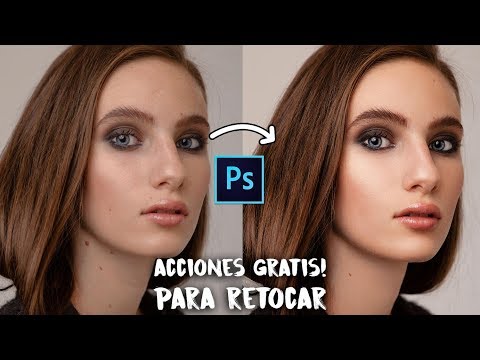
- The before-and-after comparison shows significant improvement in skin tone uniformity after applying these techniques.
Frequency Separation Method
- Introduces frequency separation as a method to enhance skin texture; it involves creating shadow and highlight layers.
- After activating the shadow layer, use a white brush at 71% opacity to reinforce shadows around the eyes and eyebrows for depth.
- Multiple passes can be made to achieve desired darkness; adjustments can be made based on personal preference.
Highlighting Techniques
- Similar techniques are applied for highlights using a white brush at 7% opacity to enhance brightness in specific areas like the eyes and nose.
- A clear difference is noted when comparing before-and-after states of illumination, showcasing effective retouching results.
Additional Actions for Eye Enhancement
- Introduces additional actions such as adding gray layers for softening effects or using tools like dodge and burn for further enhancements.
- Changing eye color is demonstrated through an overlay layer with low opacity, allowing subtle modifications without harsh changes.
Final Touches and Detail Enhancement
- The final action focuses on enhancing details by painting over important features like eyes and hair with high-opacity brushes.
- A side-by-side comparison illustrates the effectiveness of these techniques in achieving professional-looking retouches.