Ce petit bruit aux WC vous coûte une fortune
How to Detect and Fix Toilet Leaks
Introduction to Toilet Leak Detection
- The video introduces methods for detecting hidden toilet leaks that can cost homeowners €200 to €300 annually.
- It promises simple, free tricks for fixing these leaks, removing limescale buildup, and avoiding costly replacements of toilet mechanisms.
Identifying Water Supply Issues
- A one-second drip from the water supply valve can waste 18 liters per day, totaling approximately 6,500 liters a year.
- Observing slight vibrations in the water surface can indicate a leak; using paper towels helps confirm this by checking for wetness.
Checking for Common Leak Sources
- If there's no visible vibration but you suspect a leak, place a paper towel near the suspected area as an additional check.
- Tightening loose nuts with pliers can prevent leaks at connection points; hold the tank steady while tightening to avoid further issues.
Noisy Floats and Overflow Pipes
- Unusual noises from the toilet may signal that water is running due to a leak; this often occurs when the float mechanism is malfunctioning.
- Adjusting the overflow pipe's float level can stop unnecessary refilling and conserve water.
DIY Repairs vs. Professional Help
- Many minor repairs can be done without professional help; basic tools like pliers are often sufficient for tightening or replacing seals.
- Homeowners can save significant costs (up to €150 or more) by performing simple fixes themselves instead of calling a plumber.
Addressing Junction Leaks
- Leaks at the junction between tank and bowl may require tightening screws on both sides; look for drops indicating where adjustments are needed.
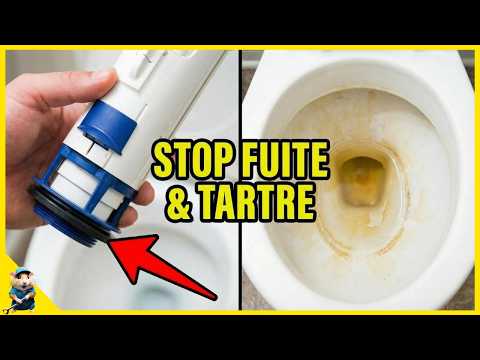
Mechanism Maintenance and Limescale Removal
- To access common leaks in the mechanism, turn off water supply, flush toilet, and carefully remove components without forcing them.
- Limescale buildup on seals can cause slow leaks; cleaning it effectively will restore functionality without needing replacement parts.
Cleaning Techniques
- Use vinegar to soak removed parts in order to dissolve limescale effectively while preserving their integrity for future use.
How to Effectively Remove Limescale from Toilet Mechanism
Cleaning the Toilet Mechanism
- The speaker discusses using a container to soak the toilet mechanism in a solution, emphasizing the importance of filtering to avoid limescale contamination. A soaking time of at least one hour is recommended for effective cleaning.
- While disassembled, it's crucial to check for limescale on the smooth surface where the seal sits, as any remaining limescale could lead to leaks into the toilet bowl.
Effective Bowl Cleaning Technique
- The speaker introduces a method for cleaning heavily limescale-encrusted toilet bowls, noting that stains can be difficult to remove without proper technique.
- To prepare for cleaning, all water must be removed from the bowl; this prevents dilution of the cleaning solution and ensures effectiveness.
- A mixture of citric acid and boiling water is used as a powerful descaler. Three heaping tablespoons of citric acid are added after boiling water is poured over it in the bowl.
Waiting Period and Scrubbing
- After applying the citric acid solution, it should sit for 1 to 3 hours depending on limescale buildup. Occasional scrubbing with a brush can help loosen stubborn deposits during this period.
- Once sufficient time has passed, a final scrub followed by flushing reveals an impressively clean bowl. This method works well regardless of whether connected to main sewer lines or septic tanks.
Reassembling the Mechanism
- After soaking overnight, the mechanism is checked for cleanliness; it should appear brand new with no remaining dirt or glitter flakes.
- Before reassembly, ensure that seals are intact and free from limescale. Proper installation is essential to prevent future leaks when putting everything back together.
Final Checks and Conclusion
- The mechanism is reinstalled carefully by locking components back into place while ensuring they function correctly before replacing covers.
- After turning on water supply and filling up the tank, perform one last leak check. If there are no leaks, then maintenance has been successfully completed. Viewers are encouraged to leave questions in comments regarding this process.