AirbusA320 OUTSIDE CHECK explained by CAPTAIN JOE
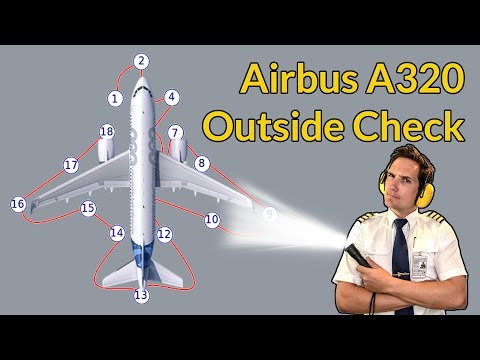
How to Perform an Exterior Walk-Around Check on an Airbus A320
Introduction to the Outside Check
- The video introduces the concept of performing an exterior walk-around check on an aircraft, specifically the Airbus A320.
- This procedure is essential for pilots to ensure that their aircraft has not sustained any damage or leaks from previous flights.
Importance of Safety Gear
- Before starting the outside check, it’s crucial to wear a high visibility vest due to safety concerns around aircraft operations.
- Ear protection is recommended because of loud noises from air conditioning packs during checks, especially on passenger jets.
- For night operations, a powerful flashlight should be used instead of a mobile phone light; turning on wing and logo lights can help spot contamination.
Initial Steps Before the Walk-Around
- Set the parking brake before checking brake wear indicators on the main landing gear.
- Look for snow accumulation on wings upon exiting onto the jetway staircase; report this for de-icing if necessary.
Detailed Inspection Process
Forward Fuselage Checks
- Start at the left forward fuselage; inspect angle of attack probes and static ports for cleanliness and damage.
- Ensure chocks are in place at nose wheel and check tire conditions for cuts or cracks. Verify that hydraulic lines show no leaks.
Nose Wheel and Lighting Checks
- Confirm that takeoff and taxi lights are functional without burnt-out bulbs or cracks. Inspect oxygen discharge indicator disc for proper condition.
Pitot Tubes and Static Ports
- Ensure both pitot tubes are clean with covers removed before flight. Check standby static port cleanliness as well.
General Condition Assessment
- Examine nose radome for cracks or bird strikes; verify slats' condition on either wing.
Engine Inspection Details
Engine Number Two Checks
- Spin engine fan blades gently while listening for unusual sounds; check blades for bends or cracks.
- Inspect generator cooling inlet and anti-ice outlet for blockages, ensuring no missing panels exist around engine pylon.
This structured approach provides a comprehensive overview of conducting an exterior walk-around check, emphasizing safety protocols, detailed inspection steps, and critical components requiring attention.
Pre-Flight Inspection Checklist
Checking the Right-Hand Wing and Slats
- Inspect the condition of the slats, ensuring that the refuel coupling filler cap is closed. Verify that fuel level indicators are flush with the wing and check for leaks from the fuel water drain valve.
- Ensure navigation and strobe lights at wingtips are undamaged. Check for any static discharges and scan for broken or missing upper fuselage antennas. Confirm ailerons hang down due to lack of hydraulic pressure, and verify flaps and control surfaces' positions.
Landing Gear Inspection
- Examine right landing gear for missing wheel nuts, deep cuts on tire sidewalls, and overall tire wear. If issues are found, call maintenance for prompt tire replacement.
- Look for damage to brake fans; check brake wear indicators. If indicators are flush with guides, request maintenance to swap brakes quickly.
Structural Integrity Checks
- Observe landing gear main structure; note limits on strut compression indicating potential hard landings. Ensure safety pin is removed from downward block springs to allow gear retraction upon takeoff.
- Confirm landing light functionality and ensure air conditioning pack outlet is unobstructed. Check VHF antenna attachment and position of outflow valve along with aft portable water drain mast.
Tail Section Examination
- Inspect horizontal stabilizer and elevator for damages caused by debris from main landing gear. Look for holes or cracks as well as static discharges.
- Monitor vertical stabilizer, fin, rudder, APU inlet/outlet, fire extinguisher overpressure disc placement, and rear navigation light condition while walking along aft fuselage.
Final Checks Before Flight
- At center fuselage, ensure all doors (e.g., ground hydraulic connections) are closed/latched. Check air conditioning back inlet door for obstructions; confirm anti-collision light integrity.
- Repeat checks on left landing gear similar to right side inspection including wings' leading/trailing edges.
Importance of Thorough Inspections
- Emphasize that pushback drivers will conduct another thorough outside check after ground crew has cleared equipment; they ensure all panels/doors are secure before flight.
- Document start/end times of pre-flight checks in technical flight log along with signature confirming completion—this process must occur before every flight.
Maintenance Protocol
- Highlight that outside checks apply not only to larger aircraft but also smaller planes/helicopters which may have protective covers marked "REMOVE BEFORE FLIGHT."
- In case of malfunctioning parts during inspections, certified technicians will document repairs in technical logs proving aircraft's airworthiness or declare it AOG (Aircraft On Ground).
Feedback Request
- Encourage viewers to comment on specific aspects of the outside check they would like more detailed videos about (e.g., antennas or instruments).