How to Use Adjustment Layers in Photoshop | Day 4
Introduction to Adjustment Layers
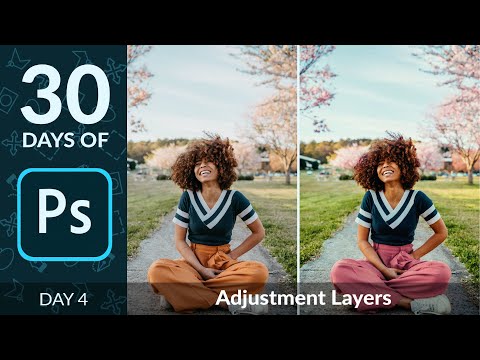
In this section, Aaron NACE introduces adjustment layers and explains their non-destructive nature. He also mentions that adjustment layers can be used to make changes to specific areas or the entire image.
Adjustment Layers in Photoshop
- Adjustment layers allow for non-destructive editing of images.
- Changes made with adjustment layers do not affect the original image data.
- Adjustments can be made to exposure, colors, and light levels.
- Adjustment layers can be applied to specific areas or the entire image.
Creating Adjustment Layers
Aaron demonstrates different ways to create adjustment layers in Photoshop.
Ways to Create Adjustment Layers
- Go to Layer > New Adjustment Layer and choose from a list of available adjustments.
- Go to Window > Adjustments and select an adjustment from the panel.
- Click on the circle icon at the bottom of the Layers panel and choose an adjustment.
Brightness and Contrast Adjustment Layer
Aaron explains how to use the brightness and contrast adjustment layer in Photoshop.
Brightness and Contrast Adjustment
- The brightness and contrast adjustment layer is useful for simple adjustments.
- The auto button calculates optimal settings for the photo.
- Opacity can be adjusted to control the intensity of the effect.
- A layer mask can be used to limit visibility to specific parts of the image.
Levels Adjustment Layer
Aaron introduces levels adjustment layer and its powerful features.
Levels Adjustment
- Levels adjustment allows precise control over black point, white point, and midtones.
- Black point makes everything left of it black; white point makes everything right of it white.
- Midpoint adjusts the central values to make them darker or lighter.
- Layer masks can be used to selectively apply adjustments.
Using Layer Masks with Adjustment Layers
Aaron demonstrates how to use layer masks with adjustment layers for selective editing.
Using Layer Masks
- Invert the layer mask (Ctrl/Cmd + I) to make it completely invisible.
- Use a brush tool to paint white on the layer mask where you want the adjustment to be visible.
- Paint black on the layer mask where you don't want the adjustment to be visible.
Curves Adjustment Layer
Aaron introduces curves adjustment layer and its similarities with levels adjustment.
Curves Adjustment
- Curves adjustment is similar to levels adjustment but offers more control.
- Black point, white point, and midtones can be adjusted using curves.
- Curves allow for precise adjustments of tonal values in an image.
Adjusting Colors
In this section, the speaker demonstrates how to adjust colors in an image using adjustment layers.
Adjusting the Sky Color
- Add more blue to the sky by creating a new adjustment layer and selecting the Blue channel.
- Use a brush tool with white paint on the layer mask to add blue to the sky.
- Adjust the opacity of the adjustment layer if needed.
Increasing Vibrance
- Create a new adjustment layer for vibrance.
- Increase vibrance to enhance saturation without affecting skin tones.
- Use a layer mask to selectively apply or hide the effect.
Changing Colors with Hue/Saturation
- Create a new hue/saturation adjustment layer.
- Target specific colors by selecting them with an eyedropper tool.
- Adjust hue and saturation for selected colors.
- Use a layer mask to limit color changes to specific areas.
Modifying Specific Colors
In this section, the speaker explains how to modify specific colors in an image using hue/saturation adjustment layers.
Changing Color of Subject's Pants
- Select yellow from the color dropdown menu in hue/saturation adjustment layer options.
- Use an eyedropper tool to click on subject's pants and change their color.
- Invert the layer mask and paint with white on it to make only subject's pants visible.
Enhancing Plant Colors
- Create another hue/saturation adjustment layer for plant colors.
- Select a color from plants using an eyedropper tool and adjust its hue and saturation as desired.
New Section
In this section, the speaker demonstrates how to adjust the background and subject colors using adjustment layers in Photoshop.
Adjusting Background and Subject Colors
- The speaker shows how to fade in the background color by applying a slight color adjustment to both the background and subject shorts. Link to timestamp
- They proceed to make the colors lighter, creating a cool effect. Link to timestamp
- Another adjustment layer is added for greens, increasing saturation and adjusting brightness. This creates a super saturated image. Link to timestamp
- The speaker ensures that each adjustment layer is affecting the image correctly by toggling them on and off. Link to timestamp
- Adjustment layers can be turned on or off at any time, allowing for easy changes. Link to timestamp
New Section
In this section, the speaker explores additional adjustment layers in Photoshop.
Color Balance
- The speaker introduces the color balance adjustment layer, which allows adjustments of colors in shadows, mid-tones, and highlights.
- By shifting mid-tones towards cyan, green, and yellow or towards blue, magenta, and red, different color effects can be achieved.
- Opacity can be adjusted to fine-tune the strength of the effect.
Black and White
- The black and white adjustment layer converts an image into grayscale.
- Different light levels of colors can be adjusted individually.
- Opacity can be lowered for desaturated effects.
Photo Filter
- The photo filter adjustment layer adds simple adjustments with various built-in filters.
- Filters like warming or cooling filters can be applied.
- Opacity can be adjusted for desired intensity.
New Section
In this section, the speaker discusses the channel mixer and color lookup adjustment layers in Photoshop.
Channel Mixer
- The channel mixer adjustment layer allows for adjustments to different color channels.
- It can be used to shift colors within an image.
- While it has a strong effect, it may require some experimentation to achieve desired results.
Color Lookup
- The color lookup adjustment layer provides pre-loaded looks or LUTs (Look-Up Tables) that process colors in different ways.
- Custom looks can also be created.
- Different looks can drastically change the appearance of an image.
The transcript does not provide further sections beyond this point.
New Section
In this section, the speaker discusses different adjustment layers in Photoshop and their applications.
Threshold Adjustment Layer
- The threshold adjustment layer reduces the number of color levels in an image.
- Increasing the threshold level adds more detail to the image, while decreasing it reduces detail.
- This adjustment layer is useful for creating graphics and analyzing complex compositing.
Gradient Maps Adjustment Layer
- Gradient maps are a fun way to colorize and tone an entire image.
- They can be used to create interesting color effects by applying different gradients.
- Lowering the opacity of a gradient map allows for subtle color toning without overpowering the image.
Selective Color Adjustment Layer
- The selective color adjustment layer enables specific adjustments to individual colors.
- It allows for subtle changes in colors by adjusting cyan, magenta, yellow, and black values.
- This adjustment layer is particularly useful for fine-tuning skin tones or making subtle color adjustments.
Grouping Adjustment Layers
- All the adjustment layers can be grouped together for easier management.
- Grouping them allows for toggling the entire group on/off and comparing before and after effects.
- Adjustments made with these layers are non-destructive, allowing for further modifications if needed.
New Section
In this section, the speaker demonstrates how to group adjustment layers and adjust their opacity to achieve a realistic effect.
Grouping Adjustment Layers
- To group multiple adjustment layers together, select all of them and use Ctrl+G (Command+G) shortcut or right-click and choose "Group Layers."
- Grouping helps organize adjustments and makes it easier to toggle them on/off as a whole.
Adjusting Opacity of Grouped Layers
- Lowering the opacity of the entire group creates a blend between the original image and the adjusted version.
- This technique can result in a more realistic effect by combining elements of both images.
New Section
In this final section, the speaker concludes the tutorial and encourages viewers to sign up for additional resources and bonus material.
Conclusion and Call to Action
- The speaker thanks the viewers for watching the tutorial series.
- Viewers are encouraged to sign up for 30 days of Photoshop, which provides a calendar with daily topics, email reminders, sample images, and exclusive bonus material.
The transcript is already in English.