How to shoot in Manual…GET OFF AUTO MODE!
Introduction
In this video, the speaker will teach how to shoot manual and unlock the creative abilities that manual offers. The speaker will explain how shooting in manual gives you ultimate control of the camera and allows you to take more creative photos.
- The speaker introduces himself as a professional nature and wildlife photographer living in Eastern Canada.
- The speaker explains that shooting in manual is not the only way to rise to a high level in photography but it gives you ultimate control of the camera.
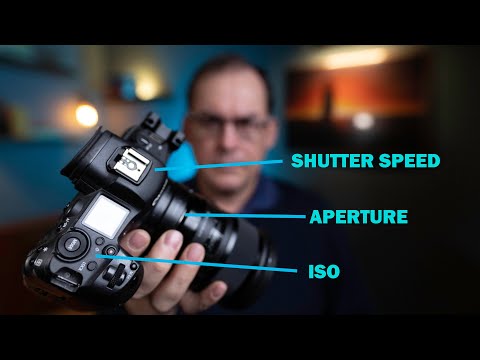
- The speaker discusses the three settings that need to be controlled when shooting in manual: shutter speed, aperture, and ISO.
Shutter Speed
- Shutter speed affects exposure by controlling how long the shutter is open to allow light onto the sensor.
- Faster shutter speeds can freeze action while slower shutter speeds may allow movement of your subject while the shutter is open making for a blurry image.
- Examples of different shutter speeds needed for different scenarios are given such as freezing someone walking or riding a bicycle at 1/320th or 1/500th of a second, sports or someone running at 1/800th or 1/1000th of a second, and freezing hummingbird wings at 1/3200th or 1/4000th of a second.
Aperture
- Aperture controls exposure by changing the amount of light on your sensor. Larger apertures let in more light while smaller apertures let in less light.
- Changing aperture also changes depth of field which is described as the amount of your image that's in focus. A large aperture creates a blurry background with thin depth of field while a small aperture creates a deep depth of field.
ISO
- ISO controls the sensitivity of your camera's sensor to light. Higher ISO values make your camera more sensitive to light, allowing you to shoot in low-light conditions but can also introduce noise into your images.
- The speaker recommends keeping the ISO as low as possible to avoid noise and only increasing it when necessary.
Shooting in Manual
In this section, the speaker explains how to shoot in manual mode and provides tips for getting started.
- The speaker recommends starting with shutter speed and aperture settings that are appropriate for the lighting conditions.
- The speaker suggests using the camera's built-in light meter to help determine proper exposure.
- The speaker advises taking test shots and adjusting settings until you achieve the desired exposure.
- The speaker provides a tip for shooting action when there isn't time to adjust settings by setting your shutter speed high enough to freeze motion and then adjusting aperture and ISO accordingly.
Conclusion
In this section, the speaker concludes by summarizing key points about shooting in manual mode.
- Shooting in manual mode gives you ultimate control over your camera and allows you to take more creative photos.
- Understanding shutter speed, aperture, and ISO is essential for shooting in manual mode.
- Practice is key when learning how to shoot in manual mode.
Understanding Aperture, Shutter Speed, and ISO
In this section, the speaker explains the three key settings in photography: aperture, shutter speed, and ISO. They describe how each setting affects the photo's exposure and creative aspects.
Aperture
- Aperture is the opening in a camera lens that controls how much light enters.
- A small aperture (big F number like f8 or F9) is used for photos where everything needs to be in focus (e.g., landscape or group photos).
- Start with aperture as the most important variable if you want both your subject and background to be in focus.
Shutter Speed
- Shutter speed controls how long the camera's sensor is exposed to light.
- Use fast shutter speeds (1/500th of a second for kids on bicycles; 1/1000th of a second for sports; 1/2500th of a second for fast-flying birds) to freeze action.
ISO
- ISO controls the brightness of your photo by adjusting how sensitive your camera's sensor is to light.
- Higher ISO values introduce noise into photos.
- Use low ISO values when shooting outside but may need higher values indoors or in dark environments.
Shooting in Manual Mode
In this section, the speaker explains why shooting in manual mode can yield better results than using automatic modes. They provide tips on how to shoot manually and explain why it's essential to control all three settings: aperture, shutter speed, and ISO.
Why Shoot Manually?
- Shooting in manual mode allows you to control the creative aspects of your photo.
- Automatic modes can't read your mind and don't know what you want creatively.
Tips for Shooting Manually
- Start with the most important variable in your photo and finish with the least important.
- Use ISO as a tweaking variable to get your exposure right.
- Finish with aperture only if it's not critical to your photo.
Controlling All Three Settings
- Controlling all three settings (aperture, shutter speed, and ISO) is essential for getting the right exposure and controlling creative aspects like depth of field and freezing action.
Setting ISO, Aperture and Shutter Speed in Manual Mode
In this section, the speaker explains how to set ISO, aperture, and shutter speed in manual mode to get the desired exposure.
Setting ISO Last
- The speaker recommends leaving ISO till your last variable to tune your exposure because it's not responsible for any of the creative aspects of your photo just an image quality one.
Setting Shutter Speed Last
- If you're on a tripod and your subject isn't moving then your shutter speed is often not very critical to the image you can leave that to last.
- For really slow shutter speeds using this technique you should use a two-second timer or shutter release to make sure the shutter vibrations don't make your images blurry.
Extra Tip: Shooting in Manual with Fast Action
- If shooting in manual is a bit of a hassle when there's fast action because you don't have time to change your settings in between the action set your ISO to automatic.
- This way you can react to quick changes in exposure levels.
Using Auto ISO with Manual Mode
In this section, the speaker explains how to shoot manual with auto ISO.
How To Shoot Manual With Auto ISO
- Set your ISO to automatic which is usually found beyond your base ISO.
Conclusion
In this section, the speaker encourages viewers to go out there and take their best ever photos by using this knowledge and tips.
Unleash Your Creative Energy
- Get out there and unleash Your Creative Energy by using this knowledge and tips.