Construir tejados ventilados (Bricocrack)
Tejados Ventilados: Importancia y Construcción
Introducción a los Tejados Ventilados
- En este tutorial se aborda la construcción de tejados ventilados, una tecnología importante con ventajas aún desconocidas en muchas zonas de España.
- Se busca la colaboración de Duroflex, especialistas en accesorios para cubiertas, para entender mejor esta técnica constructiva y sus componentes.
Problemas Comunes en Cubiertas
- La falta de ventilación en cerámicas puede causar problemas como microorganismos, hielo y fisuraciones que requieren reparaciones frecuentes.
- Los tejados ventilados permiten una corriente de aire bajo las tejas, preservando su vida útil y mejorando el aislamiento.
Proceso de Instalación
Impermeabilización Inicial
- El primer paso es asegurar que la cubierta esté impermeabilizada utilizando una lámina transpirable.
- Las láminas deben extenderse a lo largo del tejado, solapándose adecuadamente para garantizar protección total.
Colocación de Rastreles
- Se colocan rastreles verticales que crean una cámara de aire necesaria para la circulación; se recomienda un espesor entre 3 y 4 cm.
- Para proyectos a escala pequeña, se utilizan rastreles más pequeños; siempre consultar información adicional si hay dudas sobre los materiales.
Protección Adicional
- Los rastreles se protegen con banda de butilo doble cara para asegurar impermeabilidad al introducir puntas o clavos.
Fijación y Modulación
- No hay reglas estrictas sobre la distancia entre rastreles; depende de su resistencia. Es crucial centrar las puntas sobre la banda de butilo durante la fijación.
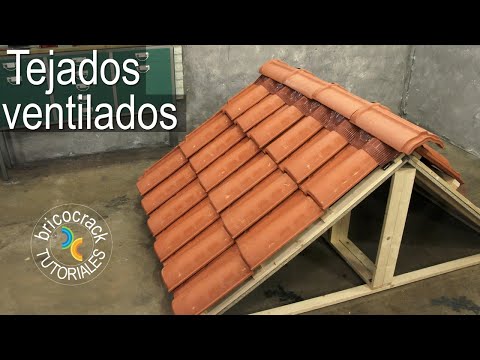
Colocación Final de Tejas
Preparativos para el Montaje
- Las tejas se atornillan y apoyan en los rastreles; cada modelo tiene márgenes específicos que deben seguirse durante su colocación.
Consideraciones Finales
Installation of Roof Tiles and Ventilation Techniques
Alero Placement and Functionality
- The alero is secured with screws to the horizontal rafter, protecting the air chamber beneath the rafters. It can be cut with scissors for precise fitting.
- The "peine de alero" (eave comb) is installed on top of the rafter, which helps seal the cavity under the tile while allowing ventilation.
Tile Support and Alignment
- Tiles placed from this point upward rest on previous tiles; if not supported, they will sag. The thickness of the eave comb ensures proper alignment with other tiles.
- Different eave comb designs are available for tiles with more pronounced curves, requiring additional support like a second rafter underneath.
Ensuring Ventilation
- Choosing an eave comb that includes a mesh guarantees ventilation; using a rafter without it may compromise airflow, which is crucial for ventilated roofs.
Rafter Installation Process
- As installation progresses, ensure that rafters are measured according to tile specifications (40 cm). A second rafter is added at the bottom for height adjustment.
- Tiles are positioned using tabs that rest on rafters before being screwed in place. Lateral seating allows overlapping of tiles for better coverage.
Calculating Rafter Height
- When installing ridge rafters at the roof's peak, measure carefully to ensure proper contact between ridge tiles and rafters.
- Two types of supports can be used; one type allows height adjustments by turning a screw after placement.
Final Adjustments and Securing Supports
- After measuring from the roof peak to determine support height, remove any obstructing tiles or rafters for access during installation.
- Ensure supports are centered relative to the peak; adjust as necessary before finalizing their position.
Completing Ridge Rafter Installation
- Once supports are set up correctly, install final rafters and check alignment against adjacent tiles. Secure them firmly with lateral screws.
Protecting Against Water Infiltration
Ventilation Solutions for Roofs
Importance of Airflow in Roofing
- The presence of waste and dust can obstruct airflow, necessitating regular cleaning to maintain air flow requirements as per building codes.
- Building regulations require approximately 800 liters of air per linear meter at the ridge, emphasizing the need for efficient ventilation solutions.
Duroflex's Aluminum Sheet Solution
- Duroflex offers a reinforced aluminum sheet that prevents fractures even when bent, ensuring durability during installation.
- Proper placement is crucial; the design allows for effective air circulation without blocking necessary airflow through the roof structure.
Installation Process
- The installation begins with shaping the aluminum sheet before adhering it using butyl adhesive, highlighting the importance of surface preparation for optimal adhesion.
- A protective system is integrated to shield the upper part of roof tiles from water ingress during installation.
Final Assembly and Resources
- Roof tiles are secured using clips and screws, creating a seamless connection between tiles while ensuring structural integrity.
- For purchasing materials discussed, viewers are directed to Duroflex’s website where they can find product listings and local distributors.
Conclusion on Ventilation Systems