Cómo alinear la polea al volante y fijar la tensión adecuada de las correas tipo V
How to Properly Align a Compressor Pulley
Importance of Proper Alignment
- The video emphasizes the significance of aligning the compressor flywheel with the motor pulley to minimize wear and maximize engine efficiency.
- It is recommended to consult the installation, operation, and maintenance manual for detailed information on compressor maintenance.
Safety Precautions
- Regular inspection and maintenance of the compressor are crucial; only qualified personnel should perform installation and maintenance tasks.
- Users must be aware that transferring toxic or flammable substances is at their own risk; always review safety guidelines in the manual before proceeding.
Tools Required for Alignment
- Necessary tools include a socket set, Allen wrenches, a straight edge at least three feet long, and a ruler for measuring alignment.
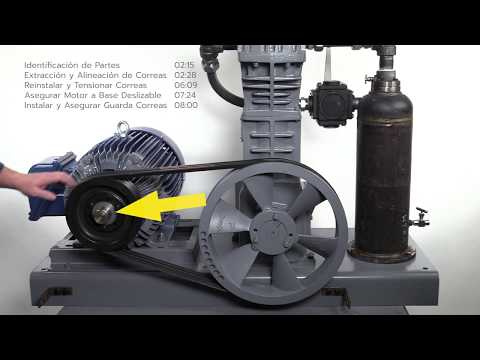
Steps for Removing Belt Guard
- To begin alignment, remove the belt guard by unscrewing five screws: two at each end and one located inside near the compressor.
Adjusting Motor Position
- Loosen nuts securing the motor to allow movement; this helps in removing belts by adjusting tension through counterclockwise turns on adjustment bolts.
- Confirm alignment between the compressor flywheel and motor pulley by ensuring that both inner edges of their respective grooves align correctly.
Measuring Alignment
- Use a right angle to measure distances from its edge to both flywheel and pulley grooves; note any discrepancies as they indicate necessary adjustments.
Adjusting Pulley Position
- If misalignment is detected (e.g., pulley needs moving inward), remove screws holding it in place before adjusting its position using threaded holes.
Finalizing Alignment Measurements
- After repositioning, re-measure distances to ensure proper alignment within specified tolerances (±1/16 inch).
Tensioning Belts Correctly
- Once aligned, reinstall belts while tightening adjustment bolts clockwise until belts are adequately tensioned without over-tightening.
Confirming Final Setup
- Check that motor pulley remains square with compressor flywheel using a straight edge; measurements should be consistent across different points on the pulley face.
Securing Components Post Adjustment
- After confirming correct belt tension (between 1/4 inch to 3/8 inch deflection), secure motor support back onto its base by tightening all mounting nuts.
Installation and Adjustment of the Belt Guard
Steps for Reinstalling the Belt Guard
- Begin by reinstalling the belt guard using five bolts to secure it in place, ensuring proper alignment.
- There is one screw located inside the guard and two screws at each end that need to be inserted.
- Start by inserting a bolt into the lower inner part of the belt guard, followed by two bolts at each end.
- After all screws are inserted, tighten them to complete the procedure for aligning and adjusting the pulley tension correctly.