First Person View POV PC BUILD Guide!
How to Build a PC: A Step-by-Step Guide
Preparing Your Workspace and Tools
- The video begins with the host expressing frustration over confusing camera angles in PC build videos, setting the stage for a clearer guide.
- Essential tools for building a PC include a number two Phillips head screwdriver, cutting implements, side cutters, needle nose pliers, cable management ties, and an anti-static wrist strap.
- The importance of using an anti-static wrist strap is highlighted to prevent static electricity damage while handling sensitive components.
Power Supply Setup
- Instructions are given on how to connect the power supply unit (PSU) to the wall and prepare it for use during the build process.
- The host discusses grounding methods using an ESD bracelet or touching metal surfaces to avoid static discharge when handling components.
Motherboard Preparation
- Viewers are encouraged to gather reference materials and consider purchasing toolkits from sponsors like iFixit for discounts available until May 31st.
- The motherboard is introduced as a critical component; viewers are reminded that part numbers may vary but the basic assembly process remains consistent.
Understanding Motherboard Layout
- Key features of the motherboard layout are explained, including CPU power connector location, RAM slots color coding for dual-channel operation, and M.2 storage slot positioning.
- Important connectors such as USB 3.0 ports and fan headers are identified; these play crucial roles in system functionality and safety.
Choosing and Installing the CPU
- Intel's Core i5-12600KF is recommended as an excellent budget gaming option due to its performance cores suitable for gaming and content creation.
- The installation process involves aligning triangles on both the CPU and socket carefully without applying force; this ensures proper placement without damaging pins.
Motherboard RMA and Memory Choices
Importance of RMA Documentation
- If you need to return your motherboard, having the necessary documentation is crucial for the RMA process.
Memory Selection for Budget Builds
- The build includes 32 GB of DDR4 memory using G.Skill RipJaws 5, which is a cost-effective choice at around $80. This option balances performance for gaming today and in the near future while staying within a $1,000 budget.
Storage Installation Considerations
Choosing Storage Solutions
- A Crucial P3 Plus one terabyte drive is selected for the operating system due to its good performance and attractive price, despite not being the fastest or having a DRAM cache. This capacity suffices for OS, applications, and some games.
Slot Selection for SSD Installation
- When installing the SSD, consider whether to use the top slot (higher speeds) or bottom slots (shared lanes). For this build, either option works fine. Aligning and securing the drive requires a Phillips head screwdriver.
CPU Cooler Installation Steps
Socket Compatibility Check
- Before installing a CPU cooler like Thermalright Phantom Spirit 120 SE, verify socket compatibility (e.g., LGA 1700), which can be found on the motherboard or product manual. Specific installation instructions may vary by cooler type.
Applying Thermal Compound Correctly
- Proper application of thermal compound is essential; an amount similar to an uncooked grain of rice is recommended to avoid waste while ensuring effective heat transfer between CPU and cooler. Remove any protective peel from coolers before installation to ensure proper contact with CPU surface.
Final Assembly Steps
Securing Components Post-Cooling Installation
- After applying thermal paste and securing the cooler onto the CPU, tighten screws in an alternating pattern to prevent strain on the motherboard during installation. Ensure all components are firmly attached before proceeding with additional assembly steps such as fan installation.
Completing Build Setup
- Once cooling components are secured properly, proceed with attaching wire clips on fans and ensuring even placement before finalizing connections within the case setup. This step ensures optimal airflow and cooling efficiency in your build configuration.
Building a PC: Step-by-Step Guide
Initial Setup and Connector Management
- The airflow setup is crucial, but the design won't allow complete downward movement due to RAM interference. However, it still provides significant airflow benefits.
- Daisy-chaining RGB connectors is straightforward; they have three pins that only fit one way. Connect the female end to the motherboard header.
- For optimal cooling, use a Y cable included with the cooler to connect both fans to either the CPU fan or CPU opt header on the motherboard.
Testing Before Full Assembly
- It's normal for systems, especially AMD ones, to take time during initial boot due to memory training. Diagnostic LEDs may indicate this process.
- After confirming all components work during a test boot, it's advisable to proceed with assembling the rest of the system before managing cables.
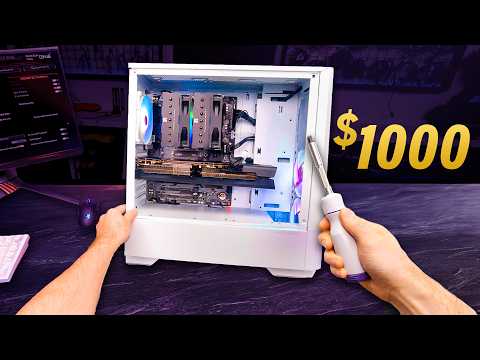
Case Selection and Preparation
- The Phanteks Eclipse G360A case was chosen for its value at $50 after rebate and includes three 120mm fans for adequate cooling.
- Consider rearranging fan positions for better airflow; removing side panels can prevent scratches during assembly.
Mounting Accessories and I/O Shield Installation
- Locate mounting accessories in your case packaging; Phanteks cases typically label these clearly but may lack organizers in budget models.
- Installing the I/O shield involves ensuring tabs are folded correctly so they don't obstruct ports when inserting into the case.
Motherboard Installation Process
- Check if standoffs are pre-installed in your case; mismatches can damage your motherboard. Confirm alignment between standoffs and holes before proceeding.
- Slide the motherboard into place while avoiding contact with metal standoffs. Install one screw initially for stability while checking for obstructions beneath it.
Final Checks Before Securing Motherboard
- Ensure no metal tabs interfere with ports or risk shorting out components. Also check that nothing is caught under the board that could cause stress when secured.
- Verify visibility of standoffs through each hole on the motherboard as an additional precaution against potential damage from misalignment.
Choosing Screws for Motherboard Installation
- Different screws (coarser threaded 6/32 vs finer threaded M3 screws) may be included with your case; consult manuals or trial-and-error methods to find suitable options for securing your motherboard.
Installing PC Components: Tips and Tricks
Screw Installation and Obstructions
- If a screw is not the right size, it will simply slip out without causing damage; switching to a 6/32 screw is an option. M3 screws are confirmed as the correct size for installation.
- Installing eight out of nine screws is acceptable as long as there are no extra standoffs present. When facing obstructions like coolers, it's advised not to stress over the installation process.
Fan Management
- Caution is advised when cutting fan wires; side cutters are preferred over scissors to avoid damaging wires. Modern fans may have multiple connectors for power and RGB functions.
- When repositioning a fan for exhaust, check for directional arrows indicating airflow. It's recommended to route leads towards the back cutout of the case for better organization.
RGB Connections
- Properly securing fans involves tightening them enough to prevent vibration but avoiding overtightening due to plastic threads. Understanding RGB connections is crucial; they require both motherboard connection and SATA power.
- The first fan connects at the bottom and daisy-chains into subsequent fans, ensuring synchronized animations from bottom front to top back if connected correctly.
Cable Routing
- While routing cables, ensure USB 3, power switch, and audio connectors are placed appropriately within their designated areas in the case.
- The USB 3 connector has a key design that ensures proper orientation during installation; misalignment can damage fragile pins.
Finalizing Connections
- Non-keyed connectors like power switches can be plugged in either way without harm; however, if LEDs do not illuminate after connection, try reversing them.
- Front panel audio connectors are keyed for easy identification during installation. Progress on building becomes evident with each successful connection made.
Power Supply Insights
- Connecting components before installing air coolers can simplify setup; modular power supplies allow easier access to connections.
- Acknowledgment of potential mistakes in component connections reassures builders that issues can often be resolved easily by reconfiguring parts as needed.
Choosing a Power Supply
- The RM750E from Corsair is highlighted as a reliable choice due to its fully modular design, quiet operation, reasonable pricing, and platinum rating from Cybernetics—considered more trustworthy than other ratings currently available.
Power Supply Orientation and Installation
Power Supply Orientation
- The speaker discusses two orientations for the power supply installation, emphasizing the importance of having a filtered air intake at the bottom for optimal cooling.
- If a case lacks a filtered intake or raised feet, the power supply may need to be oriented with the intake at the top, which could lead to higher temperatures.
Cable Connections
- The speaker pre-attaches essential cables: 24-pin connector, 8-pin EPS (CPU power), PCIe connectors, and SATA power connectors.
- Proper orientation is crucial when connecting long cables; latches must align correctly to ensure secure connections.
Hard Drive Installation
Installing the Hard Drive
- A 2TB WD Blue hard drive is chosen for its affordability and capacity for game storage.
- The installation involves using tool-less trays where screw holes must align with nubbins on the drive.
Connecting Power and Data Cables
- SATA power and data connections are made after securing the hard drive in place.
- The speaker notes that these trays can also accommodate SSD drives but recommends against buying SATA SSDs due to price similarities with NVMe SSDs.
Cable Management and GPU Unboxing
Cable Management Tips
- Emphasizes minimal cable management while ensuring that cables do not obstruct closing the case.
GPU Selection and Preparation
- The Radeon 6800 GPU is selected for its value despite being last-gen; it offers good performance with 16GB of video memory.
- Preparation includes loosening PCI slot covers to accommodate double-slot I/O plates before installing the GPU.
Final Preparations Before GPU Installation
Finalizing GPU Setup
- Removal of any unnecessary PCIe slot covers is advised before proceeding with installation.
Cooling Considerations
- Discussion on airflow emphasizes removing certain fans to allow fresh air from bottom fans into the GPU's three-fan design.
GPU Installation Process
Power Connector Setup
- The installation begins with the use of dual 8-pin PCIe power connectors instead of the newer 12-volt high-power connector, which is not compatible with this GPU.
- Care must be taken to ensure that the connectors are properly positioned inside the case and do not interfere with the motherboard. A firm push is required to secure them in place.
Connecting Power Cables
- After ensuring proper placement, locate the power connectors and avoid any potential tangling under the GPU. Check for clip alignment before plugging them in.
- It’s recommended to use two separate cables for GPUs requiring dual plugs rather than a daisy-chain style connector; however, using one cable poses negligible risk due to low power draw.
Securing the GPU
- When securing the GPU back into place, it’s advisable to use a screwdriver instead of thumb screws for better alignment and stability during installation.
- Lifting the GPU slightly while installing can help prevent sagging. Tightening power connectors from above can relieve strain on connections if no support is available.
Final Steps and Reflections
- Once everything is installed correctly, take a moment to appreciate your work and check that all components function as expected, including RGB lighting.
Tool Recommendations
iFixit Tools Promotion
- iFixit offers high-quality tool kits designed for repair needs, emphasizing their durability compared to cheaper alternatives.
- Their comprehensive tool kit includes various tweezers and a Mako driver kit with 64 bits, along with specialized tools like spudgers. A promotion offers 20% off until May 31st on all tool kits.