AZ-900 Episode 37 | Azure Cost Management
Azure Cost Management Service
In this video, Adam explains how to explore and understand the cost of your Azure environment with the use of Azure Cost Management Service. He describes what cost management is for and its core functionalities.
Introduction
- Adam introduces the topic of exploring and understanding the cost of your Azure environment with the use of Azure Cost Management Service.
- He explains that he will describe what cost management is for and its core functionalities.
Understanding Azure Cost Management
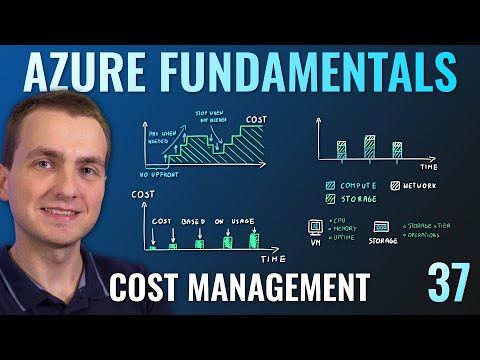
- The cost of an Azure environment is based on usage, meaning you pay only for what you use.
- Each service has multiple metrics tracked to ensure proper billing calculation.
- The purpose of Azure Cost Management is to grab all data and present it in an easy-to-ingest format.
- To access cost management in the Azure portal, search for "cost" at the top. Select "Cost Management and Billing" to enter.
- Within this section, you can see all subscriptions, invoices, payment methods, bills associated with each subscription, as well as cost analysis, post alerts, budgets, and advisor recommendations.
Reviewing Costs Associated with Your Subscription
- To review costs associated with a particular subscription:
- Select it from the overview page or select "Cost Analysis" on the left-hand side.
- You will be presented with a high-level overview of costs during the current billing period.
- Change granularity from accumulated to daily and grouping from none to service name for better understanding of billing data.
- Understand which services are driving your costs by reviewing daily spendings.
- Change time frame to last 12 months for yearly billing.
- Change granularity to monthly for total cost of your Azure subscription in each month.
Azure Cost Management Features
- Azure Cost Management has additional features like budgets.
- Budgets allow you to track spending on your Azure services and get notified when nearing the budget limit.
- You can set up alerts when actual usage reaches a certain percentage of the budget.
- One of the best features is the ability to review costs at the resource group and service level.
Azure Cost Management
In this section, the speaker discusses Azure Cost Management, a centralized service for reporting usage and billing of your Azure environment. The speaker explains how to use it to review the cost of your Azure resources within a resource group.
Using Cost Analysis
- Use cost analysis to view the cost associated with a specific resource group.
- Resource groups are logical containers used to organize your resources.
Self-Service Cost Exploration
- Azure Cost Management allows for self-service cost exploration in your Azure environment.
- This decentralizes responsibilities when it comes to the cost of Azure services and allows application teams for effective management of their Azure environments without needing any special privileges.
Budgets and Alerts
- Use budgets and alerts to track usage and get notified if you're nearing your monthly estimated cost for your Azure environment.
- Note that budgets are not a hard limit, so you cannot stop Azure services when budgets are reached. However, you can use budgets to do some automation such as executing scripts that shut down machines when nearing budget limits.
Advanced Reporting Capabilities
- Use advanced reporting capabilities by automatically exporting billing information into a CSV on Azure Blob Storage.
- Connect with any kind of reporting tool like Power BI and perform some advanced cost analysis.
Minimizing Costs on the Azure Platform
In this section, the speaker provides seven steps on how to minimize costs on the Azure platform based on what was learned in previous episodes.
Step 1: Use Pricing Calculator
- Use the pricing calculator to find low-cost regions for your Azure environment.
- Choose regions based not only on price but also latency, required services availability, data sovereignty, and compliance requirements.
Step 2: Consider Hybrid Benefit
- Check if you can use hybrid benefit and reuse some existing licenses especially if you're moving from on-premise environments.
Step 3: Use Azure Reservations
- Consider reserving some of the services within Azure with Azure reservations if you have some very stable workloads.
Step 4: Use Azure Cost Management
- Use Azure Cost Management to monitor set up budgets, hours, and even use recommendations to make sure that you're using your Azure platform effectively.
- Understand the lifecycle of your other environments. Automate and shut down development environments when they don't need to run 24x7.
Step 5: Take Advantage of Auto-scaling Feature
- Take advantage of auto-scaling feature of the Azure platform so that you only scale and create bigger services when needed and scale down when they are not needed.
Step 6: Use Azure Monitor
- Use Azure Monitor to find underutilized services and simply scale them down.
- Scale down or up at any time so you don't lose anything but save money.
Step 7: Remember About Tags and Policies
- Remember about tags for effective resource management and identifying cost owners.
- Use Azure policy which allows you to effectively manage your azure environment. For example, forbid people from creating expensive resources on their dev test environments.
Conclusion
In this section, the speaker concludes by summarizing all seven steps on how to minimize costs on the Azure platform based on what was learned in previous episodes.
- By following these seven steps, one can save a tremendous amount of money on their Azure platform.
- All materials for this episode can be found on episode 37 on the speaker's website.